Learn How To Draw A Fox: Your Simple Guide To Sketching Sly Charm
Are you looking to add a touch of wild beauty to your sketchbook? Learning how to draw a fox can be a truly rewarding experience, whether you're just starting your artistic journey or you've been sketching for a while. These clever creatures, with their bushy tails and pointed ears, certainly hold a special appeal, and capturing their unique look on paper is quite fun, you know.
Plenty of people want to create images of these adorable animals, and it's a skill that's more within reach than you might think. Our goal here is to give you a clear, step-by-step path to bringing a fox to life with your own hand. We'll explore simple techniques that help you get those charming fox drawings done in almost no time, really.
So, get ready to grab your drawing tools, whether that’s traditional paper and pencils or our own free online drawing application. We're keeping things simple and enjoyable, so you can soon have a fox sketch to proudly show off, and stuff. This lesson, quite honestly, is perfect for anyone just beginning to explore drawing.
- How Much Is 100 Gallons Of Water
- Beau Marie St Clair
- How To Ask For A Spanking
- Ella Emhoff Sexuality
- Georgina Rodriguez Pics
Table of Contents
- Gathering Your Drawing Tools
- Starting with Basic Shapes: The Foundation
- Adding Distinctive Features
- Pointed Ears and Expressive Eyes
- The Snout and Nose: Bringing Personality
- The Bushy Tail: A Signature Element
- Giving Your Fox Texture: Fur and Details
- Exploring Different Fox Drawing Styles
- Drawing a Fox with Our Online Application
- Frequently Asked Questions About Drawing Foxes
- Your Fox Drawing Journey Continues
Gathering Your Drawing Tools
Before you put any lines down, it's good to have your drawing utilities ready. For a traditional approach, you'll want some blank paper, a pencil, and an eraser. These are the basic items that help you start your drawing without any fuss. You can always get a pencil with a good grip, too, which helps with control. Make sure your paper is smooth enough for your pencil to glide, you know, for better flow.
If you're leaning towards digital art, our free online drawing application is a really great option for all ages. It lets you create digital artwork to share online and export to popular image formats like JPEG, PNG, SVG, and PDF. You can easily draw, edit photos, or even design your next business card, if that's what you need. It's a very flexible tool, honestly.
Our application also lets you craft images for social media posts, digital ads, paper, or even apparel. You can make a quick photo edit with the drag and drop feature, or lose yourself for hours in our streamlined digital makerspace. We just updated our sketchpad to version 4.1, and we think you'll really like it. If, for any reason, you want to use a previous version, you can check out our version archive, too. It's quite convenient, you see.
- Janelle Kline Kare 11
- Julie Bristow Wendy Crewson
- Etiquette When Ex Spouse Dies
- How Tall Is Jake Gyllenhaal
- Senior Swingers
Starting with Basic Shapes: The Foundation
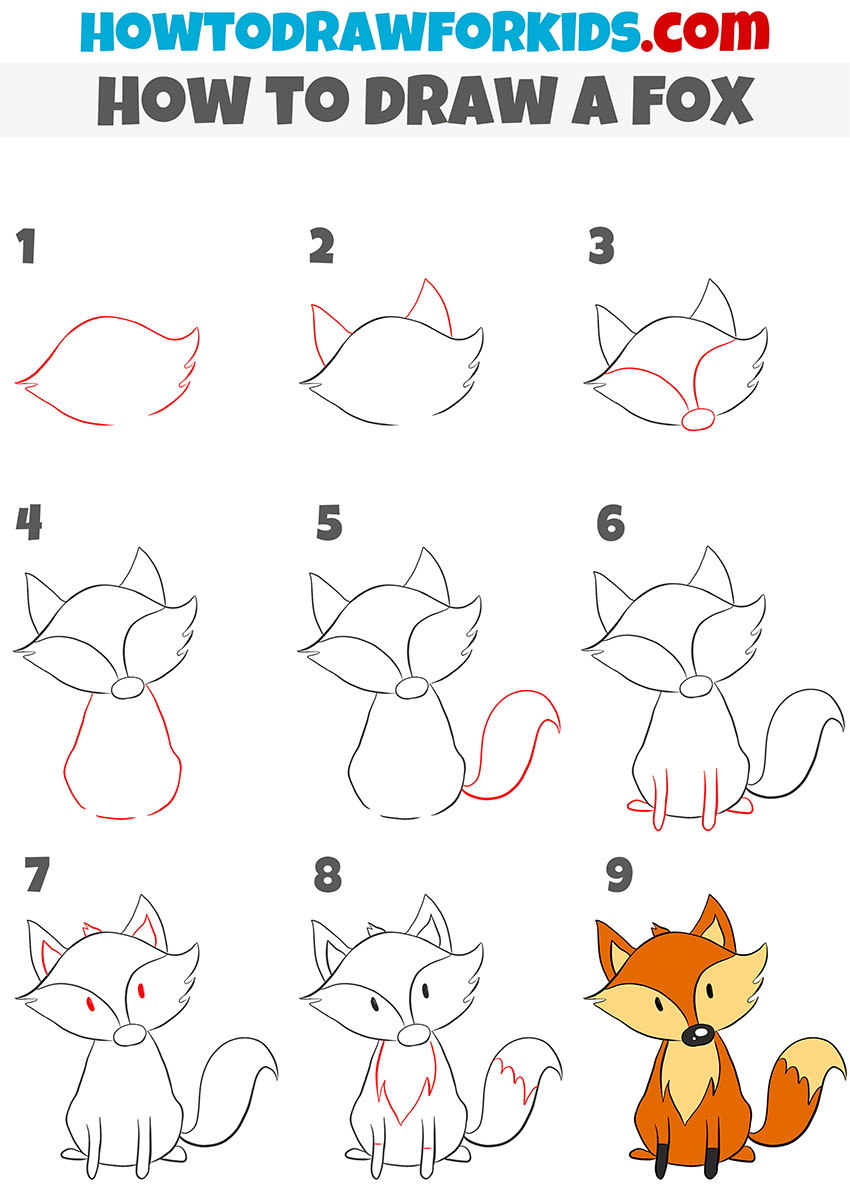
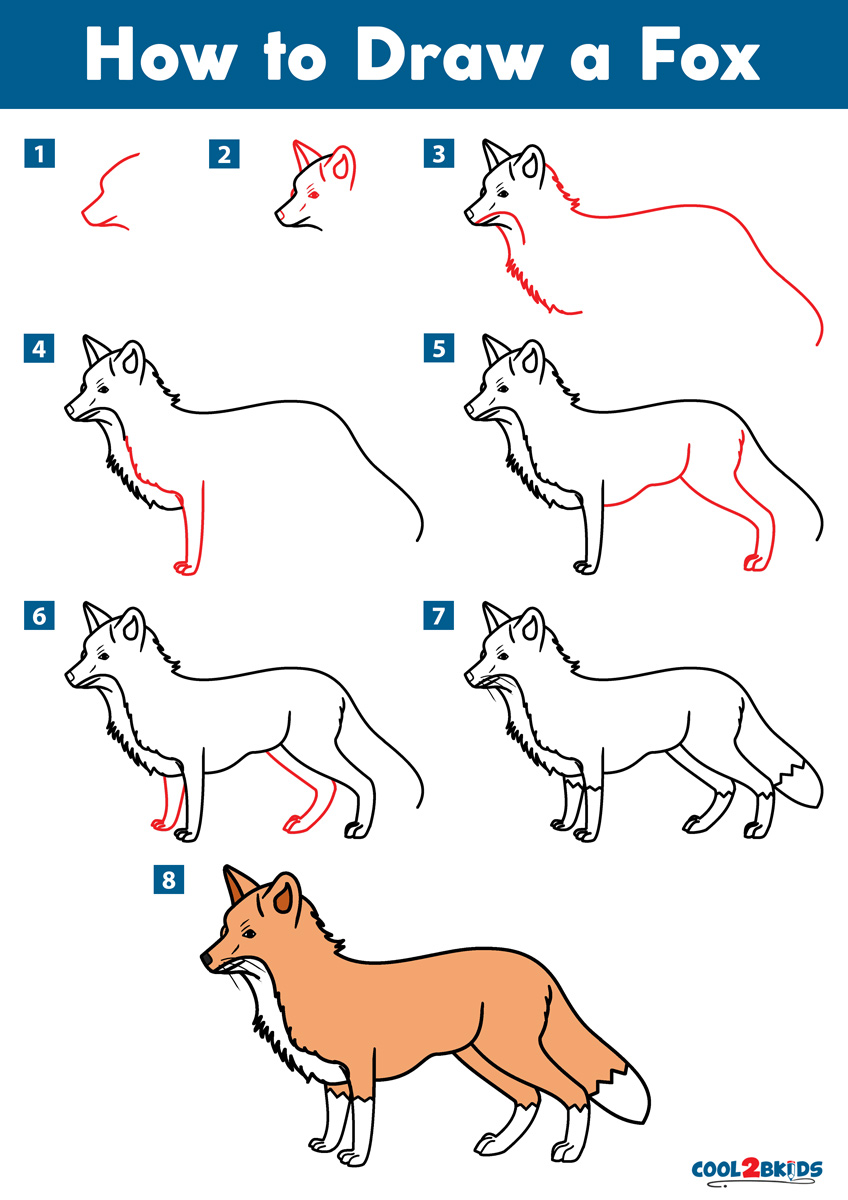
Whether you want to draw a fox in a cartoon way or a more realistic style, you should always start by sketching a pencil outline. This initial step is super important because it sets up the overall shape and proportion of your fox. Think of it as building a simple framework before adding all the neat details, you know. It's basically the skeleton of your drawing.
Beginners and children alike can now create a great looking fox by just following these early steps. We're going to use simple forms like circles and ovals to get the basic structure down. This method helps keep things from getting too complicated too soon. It's a pretty straightforward way to approach animal drawing, actually.
The Head: A Key Starting Point
To begin, put down a circle for the main part of the head. This circle doesn't need to be perfect, just a general guide. Then, attach a slightly smaller oval shape below it for the snout area. You want to make sure these shapes connect well, forming the basic outline of the fox's face. This is, in a way, the most important initial step for giving your fox character.
Next, draw a line down the middle of the head circle and another line across, slightly above the center. These lines will help you place the eyes and nose later on, keeping everything balanced. They are like guides that ensure your fox's face is symmetrical, which is quite helpful, really. It makes the next steps much easier to manage, so it does.
This initial head shape is what you'll build upon. It's about getting the general form right before you worry about finer points. Remember, these are light, sketch lines, so you can easily erase them later. You might find yourself adjusting these shapes a little bit, and that's completely normal, as a matter of fact. Practice makes it smoother.
Building the Body: From Simple Forms
Once you have the head started, move on to the body. Draw a large oval shape for the main part of the fox's body, connecting it to the head. This oval should be quite a bit bigger than the head circle. Then, add a smaller oval or circle for the rear hip area, slightly overlapping the main body oval. This gives the body a nice, natural flow, you know.
For the legs, sketch out simple stick-like lines for now, indicating where the joints and paws will go. Think of them as very basic guides to show the fox's stance. You can add small circles for the joints and ovals for the paws. This helps you get the proportions right before you add any thickness to the legs, which is pretty important.
Connecting these basic shapes smoothly is what gives your fox a cohesive look. Don't press too hard with your pencil; these are just your foundational lines. You can always refine them later. It's about getting the general pose and size down first, then you can worry about all the other things. This method is quite forgiving, actually.
Adding Distinctive Features
With the basic shapes in place, it's time to give your fox its unique personality by adding its distinctive features. This is where your drawing starts to truly come alive. These details, like the ears and eyes, really make a difference. It's almost like you're breathing life into your sketch at this point, which is rather cool.
You'll notice that even small changes in these features can give your fox a completely different expression. This part of the process is very enjoyable because you see your drawing take shape. It's about paying attention to the small things that make a fox a fox, you know. You're giving it that classic, charming look, essentially.
Pointed Ears and Expressive Eyes
Foxes are known for their sharp, pointed ears. To draw them, create two triangle shapes on top of the head circle, making sure they are a good size relative to the head. The inner part of the ear can have a smaller triangle shape inside, which gives it some depth. These ears tend to be quite prominent, you see, so get them right.
For the eyes, place them on the horizontal guide line you drew earlier on the head. Foxes have somewhat almond-shaped eyes, often with a slight upward tilt at the outer corner. You can add a small circle inside for the pupil and a tiny dot for a highlight to make them look bright and alive. This really brings out the fox's sly character, more or less.
The placement and shape of the eyes are really key to the fox's expression. Experiment a little bit with how open or closed they are to show different feelings. A little practice with these elements will make a big difference in how your fox looks. It's quite amazing how much personality eyes can add, frankly.
The Snout and Nose: Bringing Personality
The fox's snout is a fairly important part of its face. Refine the oval shape you drew for the snout, making it a bit more pointed at the end. At the very tip, draw a small, inverted triangle or a rounded "W" shape for the nose. This little detail really helps define the fox's face. You want to give it a slightly damp, shiny look, perhaps.
From the nose, draw two curved lines extending back towards the eyes, forming the bridge of the snout. These lines help give the face its three-dimensional quality. You can also add a small line curving down from the nose to indicate the mouth. This gives the fox a gentle, almost smiling look, in a way.
Paying attention to the snout and nose can really capture the essence of a fox. They are quite distinctive features. The way the snout tapers and how the nose sits on it really makes the fox recognizable. It's a subtle but powerful detail, you know, for getting the likeness just right.
The Bushy Tail: A Signature Element
No fox drawing is complete without its signature bushy tail. This tail is often as long as the fox's body and very fluffy. Start by drawing a long, curved shape extending from the back of the body. Make sure it has a good amount of volume, making it look full and soft. It tends to curl upwards a bit, too.
You can add jagged or wavy lines along the edges of the tail to suggest fur. The tip of a fox's tail is often white, so keep that in mind for coloring later. This tail is a very important part of the fox's silhouette. It really gives the animal its characteristic shape, you see.
The tail can also convey emotion, like if it's held high when the fox is alert, or tucked low when it's feeling shy. Think about the pose you want your fox to have and draw the tail accordingly. It's a fun part to draw, and it really finishes the look, honestly. It brings a lot of charm to the drawing, as a matter of fact.
Giving Your Fox Texture: Fur and Details
Once the main shapes and features are in place, you can start adding texture to make your fox look more lifelike. This means adding lines to suggest fur. Instead of drawing individual hairs, which would take ages, use short, quick strokes that follow the direction of the fur growth. This creates a more natural look, you know.
Pay attention to where the fur might be thicker, like around the neck and on the tail. You can also add some shading to give your fox depth and make it look more three-dimensional. Think about where the light source is coming from and shade the opposite areas. This really makes your drawing pop, frankly.
Don't forget the details like whiskers around the snout and small claws on the paws. These little touches really add to the realism. Even if you're drawing a cartoon fox, a bit of texture can make it more interesting. It's about bringing out the softness and wildness of the animal, essentially.
Exploring Different Fox Drawing Styles
The beauty of drawing a fox is that you can adapt your approach to fit different artistic styles. Whether you prefer a playful, simple look or a more detailed, lifelike depiction, the basic principles remain. You can choose the method that suits you best or practice drawing using all of them, which is pretty neat.
This variety allows you to really express yourself and find what you enjoy drawing most. It's about having fun with your art, you know. There's no single "right" way to draw a fox, which is quite freeing. You might find you prefer one style over another, and that's perfectly fine, really.
Drawing a Cute Cartoon Fox
For a cute cartoon fox, you'll want to exaggerate certain features. Make the head larger in proportion to the body, and give the eyes big, expressive shapes. The body can be rounder and more simplified, with stubbier legs. Cartoon styles often use fewer lines and bolder shapes, which is pretty common.
Think about making the ears extra pointy and the tail extra fluffy. You can also give your cartoon fox a cheerful or playful expression. This simple tutorial on cute fox drawing is great for children of all ages, as it focuses on fun and easy shapes. It's about capturing charm with a touch of whimsy, you see.
Cartoon foxes often have bright, solid colors. You might use a vibrant orange for the body and a crisp white for the belly and tail tip. The lines should be clean and clear. This style is very approachable and lets you create adorable fox drawings in almost no time, which is quite satisfying, honestly.
Creating a More Realistic Fox
If you're aiming for a more realistic fox, you'll need to pay closer attention to anatomy and proportions. The body should be more elongated, and the legs more slender. Focus on the natural curves of the fox's form and how its fur lays. This approach often involves more detailed shading, you know.
Observe real fox photos to get a better sense of their muscle structure and how their fur changes direction. This tutorial shows how to draw the head and face of a fox in fifteen steps with detailed examples and instructions, helping you get those lifelike details just right. It's about capturing the true essence of the animal, in a way.
For realism, use a variety of pencil pressures to create different shades and textures. Layer your strokes to build up the fur. The eyes should be more detailed, with careful attention to the pupil and iris. This style takes a bit more patience, but the results can be very rewarding, frankly. It's a deeper kind of drawing experience, so it is.
Drawing a Fox with Our Online Application
Our free online drawing application makes drawing a fox, or anything else, quite easy. You can start with basic shapes just like you would on paper. The digital tools allow for very precise lines and colors. You can create digital artwork to share online and export to popular image formats like JPEG, PNG, SVG, and PDF, which is super convenient.
One neat trick with our application is that you can draw the letter "s" to take a shortcut to the style chooser. This helps you quickly change your brush or pen type, making it easier to add fur texture or crisp outlines. It's a simple way to speed up your creative process, you know, and helps you try different looks quickly.
Also, while holding a button, you can tap the screen with different finger combinations to access tool presets that have been set up in the tool builder. This means you can quickly switch between different brushes or colors without searching through menus. It really streamlines your digital makerspace experience, honestly. It's a pretty powerful feature.
You can also use the drag and drop feature for quick photo edits or to bring in reference images for your fox drawing. This makes it simple to work from a photo if you're aiming for realism. The application is truly a versatile tool for creating images for social media posts, digital ads, paper, or even apparel. It's very flexible, basically.
Frequently Asked Questions About Drawing Foxes
How do I make my fox drawing look more realistic?
To make your fox drawing look more like a real one, focus on getting the proportions right first. Pay close attention to the way a fox's fur lays, especially around the neck, legs, and tail. Use many short strokes to build up the fur texture, and add shading to show where light hits and where shadows fall. Looking at lots of photos of actual foxes can really help you get those details just right, too. It's about observing closely, you know.
What are the easiest steps for a beginner to draw a fox?
For someone just starting out, the easiest steps involve using simple shapes. Begin with a circle for the head and a larger oval for the body. Then, add smaller shapes for the snout and ears. Connect these forms with light lines. This method helps you get the basic outline without feeling overwhelmed. You can then add the eyes, nose, and tail, keeping them simple at first. It's a very forgiving way to learn, honestly, and lets you build confidence.
Can I draw a fox on a tablet or computer?
Absolutely, you can definitely draw a fox on a tablet or computer. Our free online drawing application is a great tool for this, as it works right in your web browser. It offers a streamlined digital makerspace where you can create artwork, use different brushes, and easily export your finished fox drawing. It's perfect for all ages and lets you explore digital art without needing fancy software. You might find it quite fun, actually, experimenting with all the digital tools.
Your Fox Drawing Journey Continues
You've now got a good grasp on how to draw a fox, from starting with simple shapes to adding those charming details. Remember, practice is what helps you get better. The more you put pencil to paper, or use our digital tools, the more comfortable you'll become with capturing the unique look of these clever creatures. You can learn more about drawing techniques on our site, and we also have a page dedicated to animal art tutorials that might interest you.
Whether you want to draw a cute, simplified fox or a more detailed, realistic one, the basic ideas stay the same. Don't be afraid to try different styles and see what you enjoy most. You can find plenty of art supplies that we really like here, if you're looking for physical tools. Keep exploring, keep creating, and most importantly, have a lot of fun with your art. It's a very rewarding hobby, in a way, that lets you express yourself.
How to Draw a Fox Step by Step - Easy Drawing Tutorial For Kids
How to Draw a Fox - Cool2bKids

How to Draw a Fox - Step by Step Fox Drawing Tutorial - Easy Peasy and Fun

