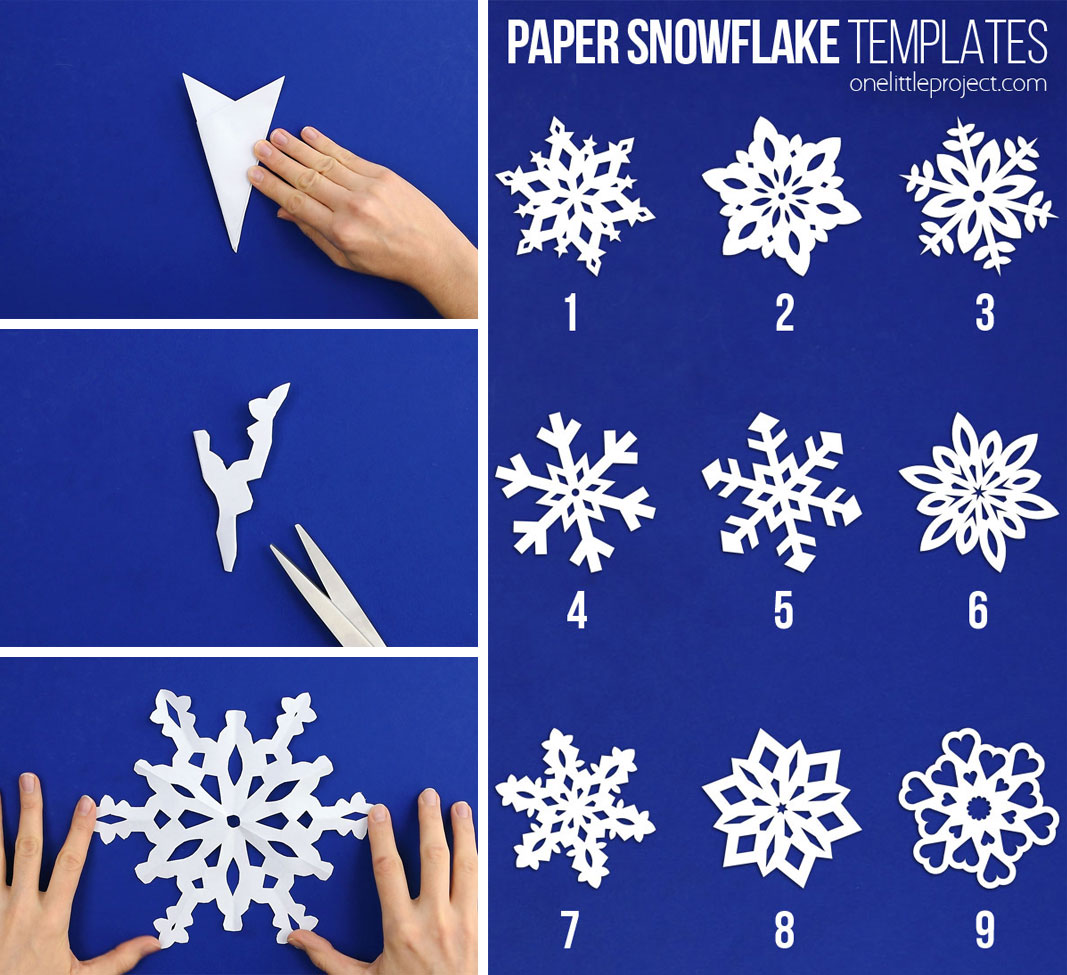
How To Make Paper Snowflakes: Your Simple Guide To Winter Crafting Fun
There is something truly wonderful about creating something beautiful with your own hands, isn't there? Making paper snowflakes is, you know, a classic winter activity that brings a lot of joy to people of all ages. It's a bit like magic, watching a plain piece of paper turn into a delicate, unique design. Plus, it’s a really nice way to decorate your home when the weather gets chilly, or just to pass some time on a cozy afternoon. This simple craft can brighten up any window or wall, and each one you make will be a little different, like real snowflakes.
In this guide, we're going to walk through, like, every step of making these lovely paper creations. We'll talk about what you need to gather, the best ways to fold your paper so your snowflakes turn out just right, and some ideas for cutting pretty patterns. You'll find out how to get those classic six-pointed designs, and we'll share some simple tips to make sure your project is a success. It’s a very satisfying feeling to unfold a finished snowflake, actually.
So, whether you're looking for a fun activity to do with little ones, or you just want to add a touch of winter charm to your space, you’ve come to the right spot. This craft is pretty inexpensive, and it needs just a few things you probably already have around the house. It's a truly rewarding experience, and you might even discover a new favorite hobby, you know, as you get going.
Table of Contents
- Gather Your Supplies
- The Basic Snowflake Fold
- Time to Cut Your Design
- The Grand Unveiling
- Creative Touches and Variations
- Troubleshooting Common Snowflake Issues
- Frequently Asked Questions
Gather Your Supplies
Before you get started on your paper snowflake adventure, it’s a pretty good idea to make sure you have everything you need close by. This way, you won't have to stop in the middle of a project to go searching for something. Having your tools ready makes the whole process smoother and, you know, more enjoyable. It’s a simple step that really helps.
What You Will Need
You actually don't need much to make beautiful paper snowflakes. The main things are paper and something to cut with. You might also want a flat surface to work on, like a table or a desk. A ruler and a pencil can be helpful too, especially if you want to be very precise with your folds. It’s pretty basic, so you probably have these things already.
Choosing the Right Paper
The type of paper you pick really does make a difference in how your snowflake turns out. Standard printer paper, which is typically 8.5 x 11 inches, is a great starting point. It’s easy to fold and cut, and it holds its shape well. You can also try construction paper for a bit more color, but it can be a little thicker and harder to cut through multiple layers. For a really delicate look, tissue paper works, but it’s very fragile, so you need to be extra gentle. Wax paper is another option that creates a slightly translucent effect, which is quite pretty, especially against a window. Just make sure whatever paper you choose isn't too thick, or your scissors might struggle, you know, to get through all the layers when folded.
- Rob Reiner And Penny Marshall
- Marta Sales Sales Age
- Iu And Lee Jong Suk Wedding
- Martasalessales Age
- Julie Bristow Wendy Crewson
The Basic Snowflake Fold
The secret to a great paper snowflake really is in the fold. Getting this part right sets you up for success, and it’s not too hard once you get the hang of it. We’re aiming for a six-pointed snowflake, which is the traditional shape and, you know, pretty classic. Just take your time with each step, and your folds will be nice and crisp.
Step 1: Start with a Square
Most paper comes in a rectangular shape, so your first task is to make it square. If you have an 8.5 x 11-inch piece of paper, take one corner and fold it diagonally across to the opposite side, making a triangle. The excess paper strip at the bottom will need to be cut off. You can use your scissors to trim this part away, creating a perfect square when you unfold it. This initial step is, you know, very important for the symmetry of your snowflake.
Step 2: Fold into a Triangle
Now that you have your square, keep it folded into that first triangle. Then, fold this triangle in half again, bringing the two pointed corners together. This will create a smaller triangle. Make sure your creases are firm and precise. This helps keep the paper neat and makes cutting easier later on. It’s all about those clean lines, really.
Step 3: Fold Again
You’re doing great! Take your current small triangle and fold it in half one more time. This will make an even tinier triangle. Press down firmly on the folds to make sharp creases. The more layers you have, the more intricate your snowflake design can be. This step adds, you know, a lot of potential for interesting patterns.
Step 4: The Final Fold for Six Points
This is the slightly trickier part, but it’s what gives your snowflake its six points. With your small triangle, orient it so the longest side is facing you and the point is away from you. Now, imagine dividing the triangle into three equal sections, like slices of a pie. Take the rightmost section and fold it over towards the center. Then, take the leftmost section and fold it over the other way, overlapping the first fold. You should end up with a shape that looks a bit like a narrow, pointed cone or a very slim triangle. It’s a bit of a balancing act to get these folds even, but it's worth it for the final shape, you know. You might need to adjust them a little to make sure they're even. Then, trim off the top part of this folded shape, making a straight cut across, so you have a clean edge to cut your designs from. This prepares your paper perfectly for cutting.
Time to Cut Your Design
Now comes the really fun part where your creativity can shine! This is where you start snipping away at your folded paper to create all sorts of patterns. There are no strict rules here, which is pretty freeing, so just let your imagination guide you. Every cut you make will contribute to the final look of your snowflake. It’s actually quite exciting.
Tips for Cutting
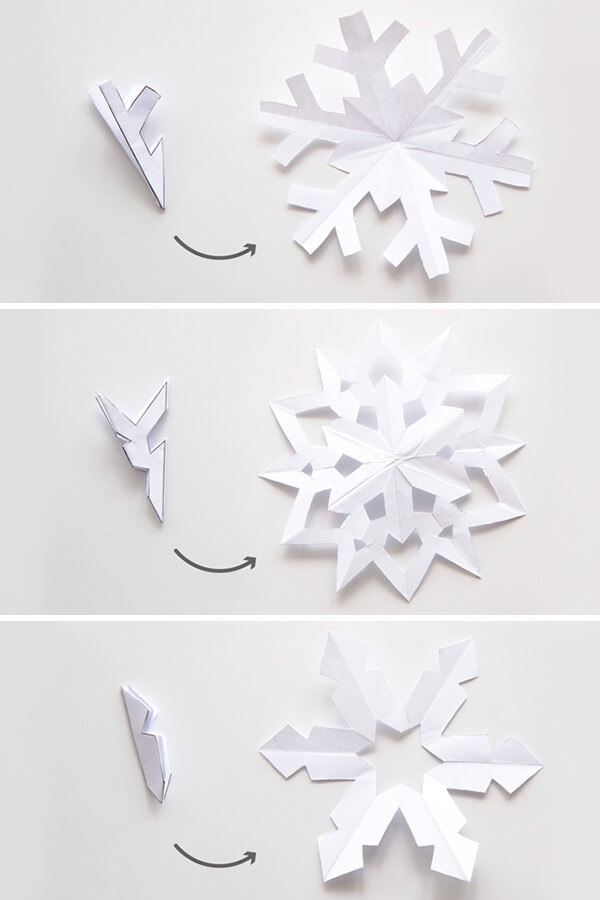
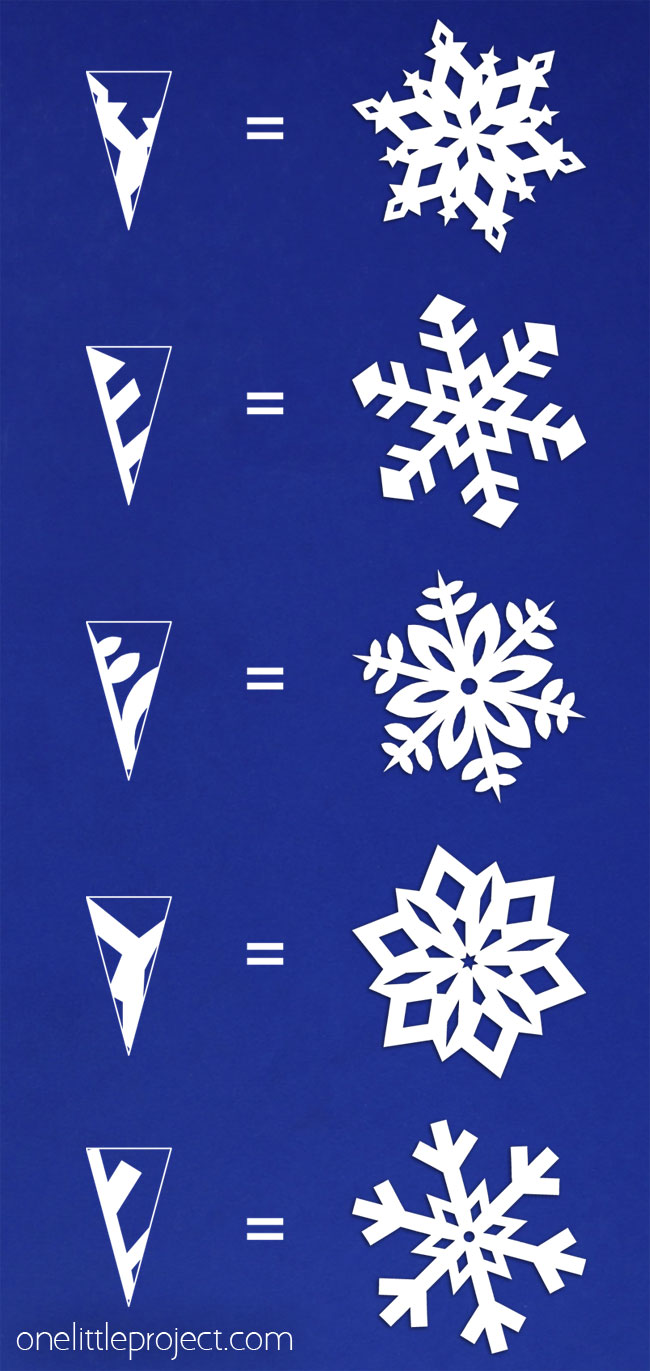
When you’re cutting, remember that you’re working with multiple layers of paper, so take your time and use sharp scissors. You can cut small triangles, circles, or wavy lines along the edges of your folded paper. Try cutting into the sides of your folded shape, and also along the tip. Avoid cutting straight across the very center point of your folded paper, as this is what holds the snowflake together. If you cut it off, your snowflake will fall apart. Think about making symmetrical cuts; whatever you cut on one side will be mirrored when you unfold it. You can also try cutting out little shapes from the middle of the folded paper, which will create holes in your snowflake. For a more intricate look, make smaller, more frequent cuts. It's a bit like drawing with scissors, you know, in a way. Experiment with different shapes – maybe some little crescents or tiny squares. The possibilities are truly endless, and each cut adds to the uniqueness.
Safety First
If you're crafting with children, it’s really important to use child-safe scissors with blunt tips. Always supervise little ones when they are using scissors. Remind them to cut away from their body and fingers. It's a fun activity, but safety should always be the top priority. You want everyone to have a good time without any mishaps, you know, so keep an eye on things.
The Grand Unveiling
This is arguably the most exciting part of making paper snowflakes! After all your careful folding and cutting, it's time to see what you've created. The reveal is always a moment of pure delight and, you know, a little bit of suspense. It’s a bit like 'awaiting decision' – you've done all the work, and now you get to see the result, full of hopeful anticipation! Every time, it feels like a little surprise.
Unfolding with Care
Gently unfold your paper snowflake, one fold at a time. Take your time with this step, as the paper can be delicate, especially if you've made a lot of intricate cuts. If you pull too quickly, you might accidentally tear a delicate part of your design. Slowly flatten each section as you go, revealing the full pattern. It’s pretty amazing to watch the design emerge from what was just a folded piece of paper. You'll see how all your small cuts have combined to form a beautiful, symmetrical pattern. It’s very rewarding, actually.
Flattening Your Creation
Once your snowflake is fully unfolded, it might be a little bumpy from all the folds. To make it nice and flat, you can place it under a heavy book for a while. Just lay it flat on a table, put a few books on top, and leave it for an hour or so. This will help smooth out the creases and make your snowflake look even more polished. You can also lightly iron it on a very low setting, with a cloth over it, but be very careful not to scorch the paper. A bit of light pressure really helps it look its best.
Creative Touches and Variations
Once you’ve mastered the basic paper snowflake, there are so many ways to get creative and make your designs even more special. This is where you can truly let your artistic side come out and, you know, make each snowflake uniquely yours. Don't be afraid to experiment a little.
Different Paper Types
As we talked about earlier, trying different kinds of paper can completely change the look and feel of your snowflakes. Imagine using colored construction paper for a vibrant display, or even patterned scrapbook paper for some really interesting effects. Coffee filters, believe it or not, also make surprisingly good snowflakes; they're thin and easy to cut, and they have a lovely delicate quality. The choice of paper can really make a big difference to the overall feel, you know, of your finished piece.
Adding Sparkle
To give your snowflakes an extra touch of magic, you can add some glitter! After you’ve unfolded your snowflake, lightly spray it with some craft adhesive or use a glue stick on certain areas. Then, sprinkle fine glitter over the sticky parts. Shake off any excess. You can also use glitter glue pens to draw patterns directly onto the snowflake. This really makes them shimmer and shine, especially when they catch the light. It’s a bit of extra effort that pays off in a big way, really.
Making a Snowflake Garland
Why stop at just one snowflake? You can string several of your creations together to make a beautiful garland. Just use a needle and thread to carefully poke a hole through one of the snowflake's points and thread them along. You can space them out or have them close together. Hang your garland across a doorway, a window, or along a mantelpiece for a festive look. It's a pretty charming way to decorate, and you know, it looks really impressive.
Larger or Smaller Snowflakes
You’re not limited to one size! Try using larger sheets of paper for big, dramatic snowflakes that can fill a window. Or, use smaller pieces of paper, like those little sticky notes, to create tiny, intricate snowflakes that could be used as gift tags or ornaments. The folding process is the same, just scaled up or down. It’s very versatile, actually, so you can make them to fit any space or purpose.
Troubleshooting Common Snowflake Issues
Even with careful instructions, sometimes things don't go quite as planned. It's totally normal to run into a few little hiccups when you're learning a new craft. Don't worry if your first few snowflakes aren't perfect; that’s part of the fun, and you know, part of learning. Here are some common problems and how to sort them out.
Tears and Rips
If your snowflake tears when you’re unfolding it, it might be because the paper was too thin, or you were a bit too rough with the unfolding. It could also mean you cut too close to the edge or made a very thin connection point. For next time, try using a slightly sturdier paper, like regular printer paper, and remember to be extra gentle when you open it up. Also, make sure your cuts don't completely sever a section; leave a little bit of paper to hold it together. It’s a pretty common issue, so don't feel bad if it happens.
Too Flimsy
Does your snowflake feel a bit floppy or not hold its shape well? This often happens with very thin paper, like tissue paper, or if you've made too many cuts, leaving very little paper to support the structure. If you want a snowflake that holds its shape better, switch to a slightly heavier paper, like cardstock or even a thicker printer paper. You could also try using a bit less aggressive cutting, leaving more paper in the design to provide strength. It’s all about finding that balance, you know, between delicate cuts and structural integrity.
Not Symmetrical
If your snowflake looks a bit lopsided, it’s probably due to uneven folds at the beginning. The key to a symmetrical snowflake is making sure your initial folds are very precise and even. Take your time in the folding steps, especially the final six-point fold. You can use a ruler to help guide your folds and ensure they are perfectly straight. Don't be afraid to unfold and refold if you notice a fold isn't quite right before you start cutting. Practice really does make perfect with these folds, you know, so keep at it.
Frequently Asked Questions
How do you make a simple paper snowflake?
To make a simple paper snowflake, you start with a square piece of paper. Fold it diagonally to make a triangle, then fold that triangle in half two more times. This creates a small, multi-layered triangle. From there, you just cut small shapes out of the folded edges and the tip. When you unfold it, you'll have a unique snowflake. It's actually quite straightforward once you get the folding down.
What kind of paper do you use for snowflakes?
The best kind of paper for snowflakes is usually standard printer paper. It's thin enough to fold and cut easily but strong enough to hold its shape. You can also use construction paper for color, or even coffee filters for a very delicate look. Avoid paper that's too thick, as it can be really hard to cut through all the layers when it's folded. So, you know, something that bends easily is good.
How do you cut a 6 pointed snowflake?
To get a 6-pointed snowflake, the folding method is very important. After you've folded your square paper into a small triangle three times, you need to make one more special fold. You divide the final small triangle into three equal sections by eye, then fold the right section over to the center, and the left section over the other way, overlapping the first fold. This creates a narrow, pointed shape. Then, you cut off the top part of this shape in a straight line before you start cutting your designs. This particular fold is what gives you those six distinct points when you unfold it. You can learn more about origami and paper crafts on other sites, or link to this page Winter Decorations on our site.
How to Make Paper Snowflakes | One Little Project
How to Make Paper Snowflakes - The Printables Fairy
How to Make Paper Snowflakes | One Little Project

