How To Remove Gel Polish At Home Safely And Easily
Are you finding yourself with gel polish that needs to come off, but you just can't make it to the salon right now? You are certainly not alone in this situation. Many people are looking for ways to refresh their nails without having to leave the house, and it's almost a common thing these days. Getting your gel polish off at home can seem a bit tricky, but with the right steps and a little patience, you can absolutely do it yourself. It's a way to save both your time and your money, which is pretty great, you know?
It's true that keeping your nails looking good is a nice thing, and gel polish really does last. But when it's time for a change, or if a nail starts to chip, getting that polish off can feel like a big hurdle. Nobody wants to damage their natural nails, and that's a very real concern for many of us. There are ways to do this removal process gently, keeping your nails healthy and strong.
This post is here to show you exactly how to remove gel polish right in your own home. We will walk through the tools you need and each step of the process. You'll find out how to get a fresh start for your nails, all while making sure they stay in good shape. It's actually simpler than you might think, and you'll feel pretty good about doing it yourself, too.
- Ali Krieger Jersey
- Gus On Major Crimes
- Kimmy Granger Ill Protect You
- Indian Uncut Web Series Cast
- Giantess Comic
Table of Contents
- Why Remove Gel Polish at Home?
- What You'll Need for Gel Polish Removal
- The Step-by-Step Guide to Removing Gel Polish Safely
- Expert Tips for Healthy Gel Polish Removal
- Common Mistakes to Avoid
- Frequently Asked Questions About Gel Polish Removal
Why Remove Gel Polish at Home?
So, why would you want to remove gel polish yourself? Well, for one thing, it can save you a lot of time. You don't have to schedule an appointment or travel to a salon, which is pretty convenient. You can just do it whenever you have a free moment, like your own little at-home spa session. This flexibility is a big plus for busy schedules, you know?
Another big reason is saving money. Salon removals can add up over time, and doing it yourself means you only pay for the supplies. Those supplies are usually pretty inexpensive and last for many uses. It's a smart way to keep your beauty routine more budget-friendly, and that's something many people appreciate.
Beyond that, knowing how to remove gel polish yourself gives you more control over the process. You can be as gentle as you need to be, paying close attention to your nail health. This can help prevent damage that might happen if someone else is rushing or using methods that aren't quite right for your nails. It's about taking good care of your nails, really.
- Martin Short Gay
- Princess Emily Dire
- Padma Mccord Wikipedia
- Katy Perry Diddy
- Where Does Belle Delphine Live
What You'll Need for Gel Polish Removal
Before you get started, it's good to have all your tools ready. Having everything within reach makes the process smoother and less messy. You don't want to be searching for things in the middle of it, you know? These are the basic items you'll want to gather.
Pure Acetone
This is the main ingredient for dissolving gel polish. You need pure acetone, not just regular nail polish remover. Regular remover often has less acetone or other ingredients that won't break down gel polish effectively. Look for bottles that say "100% pure acetone" to make sure it's strong enough. This is really important for the process to work well.
Cotton Balls or Pads
You'll use these to soak up the acetone and place it directly on your nails. Cotton balls work fine, but flat cotton pads might be a little easier to shape and keep on the nail. Make sure you have enough for all your fingers, plus a few extra just in case. You'll want them pretty saturated, so keep that in mind.
Aluminum Foil
Small squares of aluminum foil will help hold the acetone-soaked cotton firmly against your nails. This creates a little warm environment that helps the acetone work its magic. Cut the foil into pieces that are big enough to wrap around your fingertip and hold the cotton in place. About 3x3 inches or so usually works pretty well for this.
Nail File or Buffer
You'll need a file to gently rough up the top layer of your gel polish. This helps the acetone get through to the layers underneath. A coarse grit file or a buffer block works well for this first step. Just be careful not to file down to your natural nail, as that's something you definitely want to avoid.
Cuticle Oil or Petroleum Jelly
Acetone can be drying to your skin and cuticles. Applying a bit of cuticle oil or petroleum jelly around your nails before you start will protect your skin. This creates a barrier that helps keep your skin from getting too dry or irritated. It's a small step that makes a big difference for comfort and nail health, really.
Orange Stick or Cuticle Pusher
Once the gel polish has softened, you'll use this tool to gently push it off your nail. A wooden orange stick or a soft rubber cuticle pusher is ideal. Avoid using anything metal or sharp, as those can easily scratch or damage your natural nail plate. The goal is gentle removal, you know?
The Step-by-Step Guide to Removing Gel Polish Safely
Now that you have everything ready, let's get into the actual steps for how to remove gel polish. Remember, patience is a big part of this process. Rushing can lead to damage, and that's the last thing you want for your nails, so take your time.
Prep Your Nails
First, use your nail file or buffer to gently file off the very top layer of your gel polish. You're just trying to remove the shine, not dig into the color or your natural nail. This step helps the acetone soak in more effectively. It's like breaking the seal on the polish, you know?
Next, apply a generous amount of cuticle oil or petroleum jelly around your cuticles and the skin surrounding your nails. This creates a protective barrier against the drying effects of the acetone. It's a simple way to keep your skin happy during the process, and it really does help.
Soak Time
Tear off about ten small pieces of aluminum foil, roughly 3x3 inches each. Take a cotton ball or pad and saturate it completely with pure acetone. Make sure it's really wet, but not dripping excessively. You want it to be soaked through, actually.
Place the acetone-soaked cotton directly on top of your gel-polished nail. Then, take one of your foil pieces and wrap it tightly around your fingertip, securing the cotton ball in place. Make sure it's snug, but not so tight that it cuts off circulation. Repeat this for all your nails, so they are all wrapped up, you know?
Now, this is where patience comes in. Let your nails soak for at least 15 minutes. Some thicker gel polishes might need a bit longer, maybe up to 20 minutes. You might see some of the polish starting to lift or bubble under the foil. This is a good sign that the acetone is working its magic, so just let it do its thing.
Gentle Removal
After the soaking time, remove one foil wrap and cotton ball from a nail. You should see the gel polish looking soft, bubbly, or even peeling away from the nail plate. If it looks mostly intact, re-wrap it and let it soak for another 5-10 minutes. Don't try to force it off if it's not ready, that's really important.
Using your orange stick or cuticle pusher, gently scrape or push the softened gel polish off your nail. Work from the cuticle area towards the tip. If there are stubborn bits, don't pick or pry. Instead, re-soak that nail for a few more minutes. The key here is to be very, very gentle to avoid damaging your natural nail. You want it to come off easily, more or less.
Repeat this process for each nail, one at a time. It's often best to remove one foil wrap, clean that nail, and then move to the next. This keeps the acetone working on the other nails while you're cleaning one. It helps keep the polish soft for easier removal, too.
Aftercare for Healthy Nails
Once all the gel polish is removed, your nails and cuticles might feel a bit dry. This is totally normal because of the acetone. Wash your hands thoroughly with soap and water to remove any remaining acetone residue. Then, pat your hands dry, you know?
Now is the time to really moisturize. Apply a generous amount of cuticle oil to each nail and massage it into your cuticles and nail plate. You can also use a rich hand cream or lotion to hydrate your hands. This step is super important for restoring moisture and keeping your nails healthy after the process. It's like giving your nails a drink after a long day.
Consider giving your nails a break from polish for a day or two, or even longer if you can. This allows them to rehydrate and strengthen naturally. You might also want to buff them very lightly to smooth any rough spots, but don't overdo it. Your nails will thank you for this little rest, actually.
Expert Tips for Healthy Gel Polish Removal
We asked nail experts for their pro tips on how to remove gel polish safely and easily. Their advice can help you get the best results while keeping your nails in top condition. These little bits of wisdom can make a big difference, you know?
Patience is Key
This is probably the most important piece of advice. Rushing the removal process is the fastest way to damage your nails. If the gel polish isn't sliding off easily, it means it hasn't soaked long enough. Just re-wrap and wait a bit more. It's better to add a few more minutes of soaking than to peel or scrape, honestly.
Think of it like cooking; you wouldn't take a cake out of the oven too early. The same idea applies here. Giving the acetone enough time to work means less effort for you and less stress on your nails. This really is crucial for a good outcome.
Don't Force It
If you find yourself needing to apply a lot of pressure with the orange stick, stop. That's a clear sign the polish isn't ready to come off. Forcing it can lift layers of your natural nail along with the gel, which can weaken your nails significantly. This can lead to thin, brittle nails later on, and that's something nobody wants, you know?
If you encounter a stubborn spot, just re-saturate a fresh cotton piece with acetone and re-wrap that nail. Give it another five to ten minutes. Sometimes, a little extra time is all it takes for the polish to release properly. It's better to be safe than sorry with your nails.
Moisturize, Moisturize, Moisturize
Acetone is very drying, not just to your nails but to your skin around them. After you finish the removal, don't just stop there. Apply cuticle oil or a rich hand cream several times a day for the next few days. This helps replenish the moisture that was lost. It's like giving your nails a spa treatment after a workout, really.
Dermatologist Shari Lipner, MD, FAAD, shares her secret for removing gel nail polish at home, emphasizing the importance of moisturizing your cuticles with petroleum jelly. This simple step protects your skin during the process and helps your nails recover. It's a small effort for a big benefit, you know?
Give Your Nails a Break
After removing gel polish, it's a good idea to let your nails breathe for a while. Avoid immediately applying another layer of gel or even regular polish. This rest period allows your nails to rehydrate and regain their natural strength. It's like a recovery period for your nails, you know?
During this break, keep them moisturized and protected. You might notice them feeling a little softer than usual, which is normal. A few days to a week of being polish-free can make a big difference in their overall health and resilience. You can learn more about nail care tips on our site, which might help.
Listen to Your Nails
Pay attention to how your nails feel during and after the removal process. If they feel sensitive, look discolored, or appear damaged, it's a sign that they need some extra care. Don't ignore these signals. Sometimes, a professional might be needed if there's significant damage, so keep that in mind.
If you notice any unusual changes, like persistent dryness or brittleness, it might be worth consulting a nail professional or a dermatologist. They can offer advice specific to your nail health. Your nails tell you a lot about their needs, you know?
Common Mistakes to Avoid
While removing gel polish at home can be simple, there are some common pitfalls that can cause damage. Knowing what not to do is just as important as knowing what to do. Avoiding these mistakes will help keep your nails healthy, and that's the main goal, you know?
Peeling or Picking
This is probably the biggest no-no when it comes to gel polish removal. When you peel or pick at gel polish, you're not just removing the color. You're often taking off layers of your natural nail plate along with it. This can lead to severely thinned, weakened, and damaged nails. It's a very common mistake, but one that causes a lot of trouble.
Resist the urge, even if a little bit of polish is lifting. Always go back to the acetone soak method if the polish isn't coming off cleanly. Your nails will thank you for this patience, honestly. It's just not worth the damage.
Aggressive Filing
While filing the top coat is a necessary first step, over-filing can be very damaging. You only need to remove the shine, not dig deep into the polish or, worse, your natural nail. Filing too aggressively can thin your nail plate, making it weak and prone to breaking. This is a subtle mistake that can have big consequences, you know?
Use a gentle touch and check your progress frequently. If you see your natural nail color showing through, you've gone too far. A light buffing is usually enough to break the seal, so keep that in mind.
Skipping Aftercare
As we've talked about, acetone is drying. Skipping the moisturizing step after removal can leave your nails and cuticles parched and brittle. Dry nails are more likely to break, peel, or become otherwise unhealthy. This step is often overlooked, but it's really important for overall nail health.
Make a habit of always applying cuticle oil and hand cream after gel polish removal. It's a simple routine that makes a big difference in keeping your nails strong and hydrated. Your nails will look and feel much better, you know?
Using the Wrong Products
Some people try to remove gel polish with regular nail polish remover that isn't 100% pure acetone. This just won't work effectively. Gel polish is designed to be durable, and it needs the strength of pure acetone to break down properly. Using weaker removers will just lead to frustration and potentially more damage from trying to force the polish off.
Always double-check that your remover is pure acetone before you start. It's the right tool for the job, and using it makes the process much easier and safer. You can find more information about nail product choices on our site, which might be helpful.
Frequently Asked Questions About Gel Polish Removal
People often have questions when they are trying to remove gel polish at home for the first time. Here are some common things people ask, with answers that can help you feel more confident about the process, you know?
Q: How long does it actually take to remove gel polish at home?
A: The actual soaking time is usually around 15 to 20 minutes for most gel polishes. However, the whole process, including filing, wrapping each nail, and then gently pushing off the polish, can take anywhere from 30 minutes to an hour. It really depends on how many layers of polish you have and how well it softens. Patience is a big part of it, so don't rush.
Q: Can I remove gel polish without using acetone?
A: While some methods claim to remove gel polish without acetone, like using rubbing alcohol or even just peeling, these are generally not recommended. Acetone is the most effective and safest way to dissolve gel polish without causing significant damage to your natural nails. Other methods might not work well, or they could cause more harm by making you peel the
- Monica Barbaro The Fappening
- Soul Cycle Cancellation Policy
- Best Years For Toyota Highlander
- Web Series Uncat
- How To Ask For A Spanking
![How To Remove Sticky Residue: 13 Effective Methods [+ FAQs]](https://selleys.com.sg/wp-content/uploads/2023/01/Infographic-on-methods-to-remove-sticky-residue.png)
How To Remove Sticky Residue: 13 Effective Methods [+ FAQs]
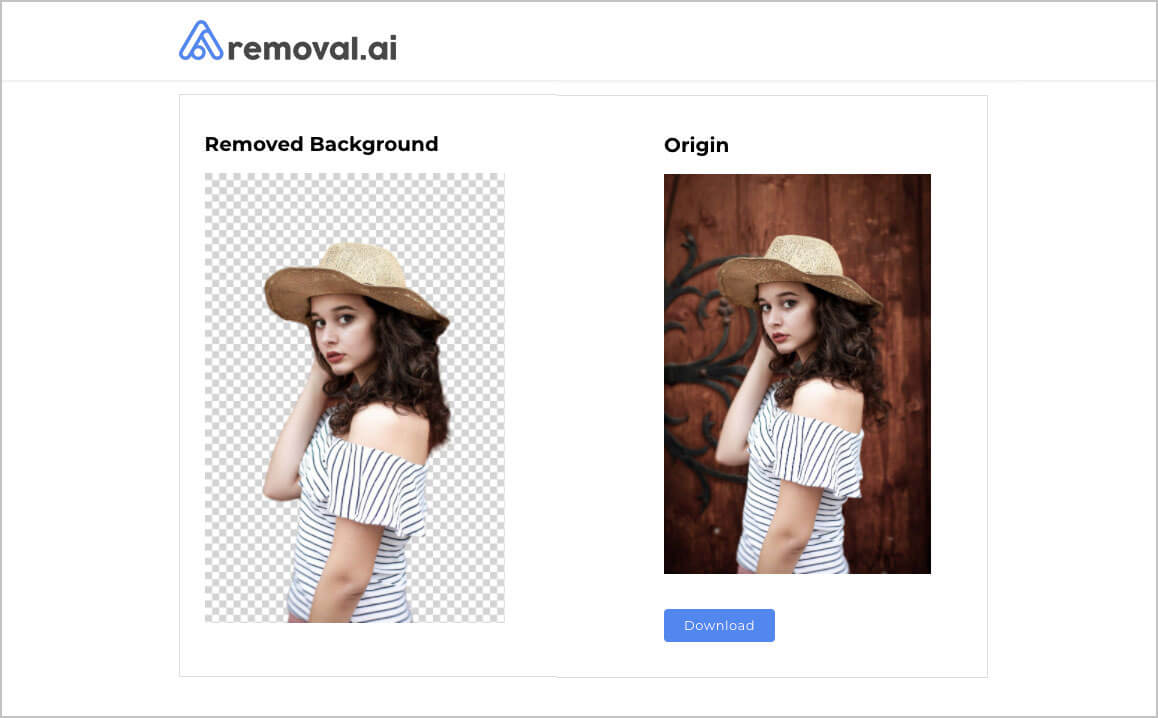
Top 10 Free Online Background Remover Tools | Removal.AI
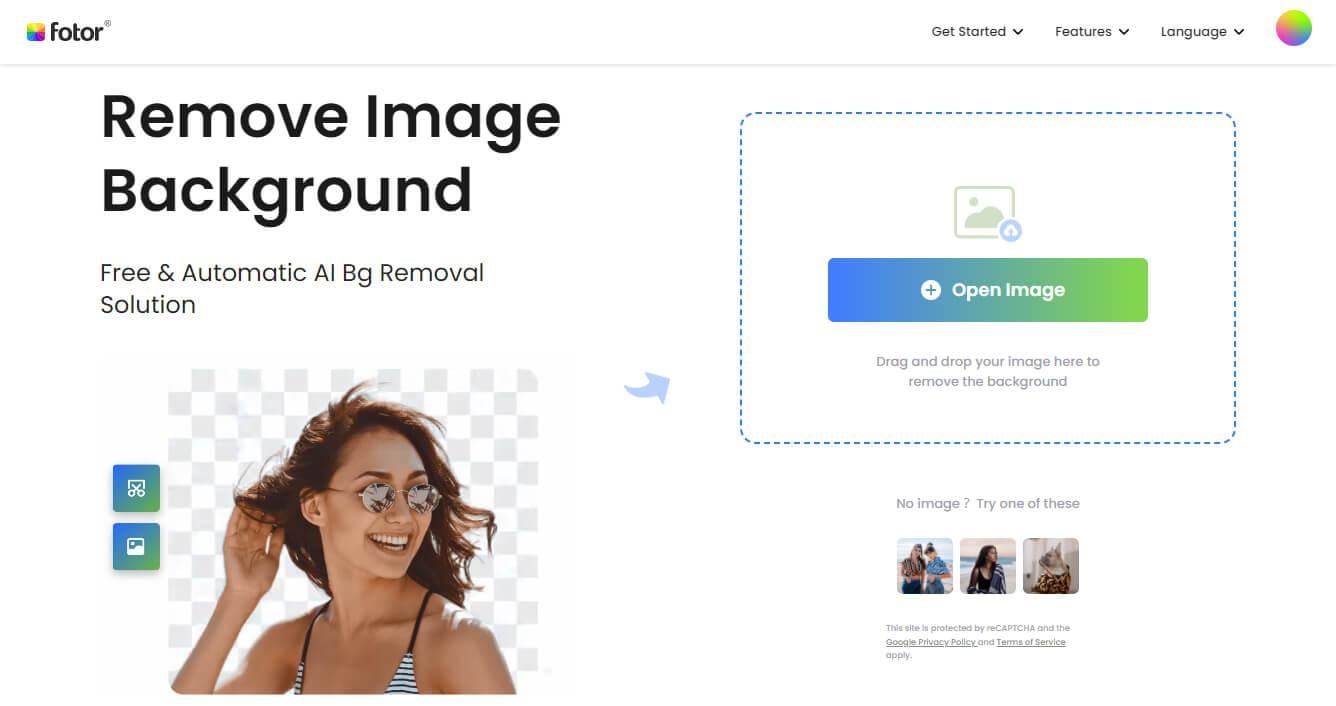
How to Remove Background from Picture: Free Tools & Apps | Fotor

