Mastering How To Draw Anime Eyes: Your Easy Step-by-Step Guide For Expressive Characters
Ever wondered how those amazing anime characters manage to show so much feeling, just with their gaze? It's really all about their eyes, you know. Anime eyes are big, often very bright, and full of expression, making characters feel so alive and relatable. They're actually a pretty fun part of drawing, and they might seem a bit tricky at first, but with a little guidance, you'll see they're quite simple to put down on paper.
Many folks, especially those just starting out with art or wanting to bring their own characters to life, find themselves curious about how to draw anime eyes. They want to capture that special sparkle or the deep emotions that these eyes convey. The good news is that these eyes are mostly built from just a few basic shapes, and once you get those down, you can really start playing around with different looks.
In this guide, we're going to walk through the process together, bit by bit. We'll explore how to draw anime eyes in a way that's easy to follow, even if you're a complete beginner. You'll learn the core steps, and we'll even touch on how to create different styles, like eyes for male or female characters. By the time we're done, you'll have some neat tricks up your sleeve to make your drawings truly pop.
Table of Contents
- What Makes Anime Eyes So Special?
- Getting Started: Your Basic Tools
- The Core Shapes: Building Blocks for Any Anime Eye
- Step-by-Step: Drawing a Standard Anime Eye
- Exploring Different Styles: Male vs. Female and More
- Tips for Bringing Your Anime Eyes to Life
- Common Mistakes to Sidestep
- Frequently Asked Questions (FAQ)
What Makes Anime Eyes So Special?
So, what exactly sets anime eyes apart from, say, realistic human eyes? Well, they're often much larger in proportion to the face, and that's a big part of their charm. This exaggeration helps convey a wide range of feelings, from pure joy to deep sadness, sometimes with just a slight change in shape or a tiny highlight. It's really quite amazing how much emotion you can pack into them.
They're also known for their distinct, often reflective quality, with those bright, almost glassy highlights that make them sparkle. These reflections are key to making the eyes feel alive and full of energy. A character’s entire personality, you know, can often be read just by looking at their eyes in anime.
Another thing is that anime eyes, in a way, simplify human features, yet they manage to keep so much expression. They might look complex, but they're built on pretty straightforward geometric forms like circles, ovals, and curves. Learning these basic building blocks makes drawing them a lot less intimidating for anyone, even for kids and beginners, which is pretty neat.
Getting Started: Your Basic Tools
Before we jump into the drawing itself, let's just quickly go over what you'll need. You don't need anything fancy, really. A simple pencil, maybe a few different hardnesses like an HB for sketching and a 2B for darker lines, would be helpful. An eraser, of course, is a must for fixing any little slips, and a good quality paper works best.
Some people also like to use a fine-point pen for inking their finished lines, which gives them a crisp, clean look. If you plan to add color, you might want some colored pencils, markers, or even digital drawing tools if that's your thing. But for now, just a pencil and paper are perfectly fine to get started, so don't worry about having everything right away.
Remember, the most important tool you have is your hand and your willingness to practice. You don't need expensive supplies to create something beautiful, honestly. Just get comfortable with what you have, and let's get drawing, shall we?
The Core Shapes: Building Blocks for Any Anime Eye
Every anime eye, no matter how detailed or expressive, starts with some very basic shapes. Think of these as your foundation. Usually, it begins with an oval or a slightly flattened circle for the overall eye shape. This helps you get the general size and placement right on your character's face.
Inside that main shape, you'll place another circle for the iris, which is the colored part of the eye. And then, a smaller circle in the very center for the pupil. It's almost like drawing a target, really. These simple shapes help you map out where everything will go before you add any finer details.
Even the eyelids are just curved lines that follow the top and bottom of that initial eye shape. So, if you can draw a decent oval and some circles, you're already halfway there to drawing anime eyes. It's really that straightforward, in some respects.
Step-by-Step: Drawing a Standard Anime Eye
Alright, let's get into the actual drawing process. We'll go through this step by step, making it super easy to follow along. This method will help you draw a standard anime eye with a normal, open expression, which is a great starting point for any style, you know.
Step 1: The Basic Outline
Start by lightly sketching a horizontal guideline. This line will help you keep your eye level and symmetrical, especially if you're drawing two eyes. Above this line, draw a slightly curved upper eyelid line. This isn't a full arc, but rather a gentle curve that begins to define the top of the eye.
Below the guideline, draw a similar, but perhaps slightly flatter, curved line for the lower eyelid. These two lines should meet at the outer corner, and the inner corner will be slightly rounded. Think of it like drawing a soft, elongated almond shape, just a little bit. Keep your lines very light for now, as you might need to adjust them.
The goal here is to get the overall form and placement right. Don't press too hard with your pencil; these are just guide marks that you'll refine later. This initial shape is pretty important, as it sets the stage for everything else you'll add.
Step 2: Adding the Iris and Pupil
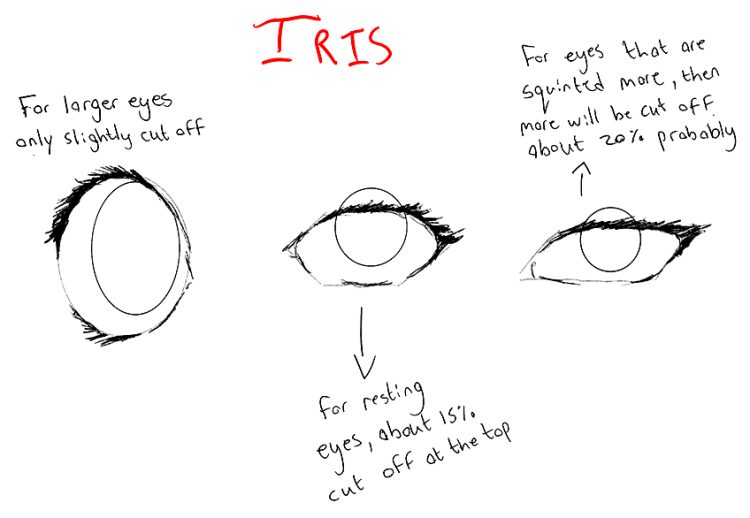
Next, draw a large circle inside your eye outline for the iris. This circle will usually be partially covered by the upper eyelid, so you'll only see the bottom portion of it. The top of the iris often disappears behind the upper lid, which gives the eye a more relaxed and natural look, you see.
Within that iris, draw a smaller, perfectly round circle for the pupil. This should be centered within the visible part of the iris. The size of the pupil can change the expression a bit, so keep that in mind. A larger pupil can sometimes make a character seem more innocent or surprised, for instance.
Make sure these circles are drawn with a light hand, too. You'll darken them later, but for now, we just want to get their positions correct. This stage really starts to make your eye look like an eye, doesn't it?
Step 3: Crafting the Eyelids and Lashes
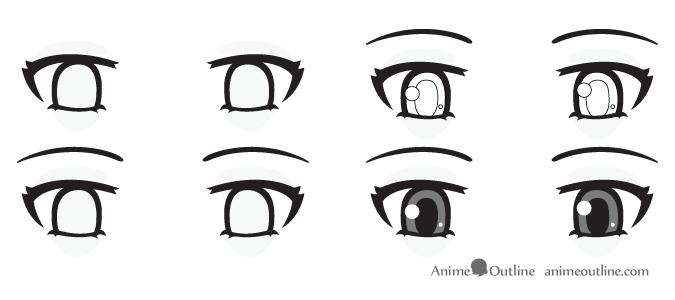
Now, let's refine those eyelid lines. Make the upper eyelid line a bit thicker and darker, especially towards the outer corner. This line represents the actual eyelid and often has a bit more weight to it. You can also add a subtle crease line just above the upper eyelid, which helps give the eye more depth and form, particularly for female characters or those with more defined eyes.
For the lashes, start from the upper eyelid line. Anime lashes are usually drawn as groups of thick, pointed spikes rather than individual hairs. They tend to fan out from the outer corner, curving upwards. You might add two or three distinct clumps of lashes on the upper lid. On the lower lid, lashes are often much sparser, perhaps just one or two small, subtle points near the outer corner, or sometimes none at all, depending on the style. It's almost like a little starburst of lines, you know.
The number and thickness of lashes can really change the look of the eye, so feel free to experiment a bit here. Female characters usually have more prominent lashes than male characters, typically.
Step 4: Highlighting and Reflections (The Sparkle!)
This is where the eye truly comes alive! Highlights are those bright, shiny spots that make the eye look wet and reflective. They're incredibly important for giving anime eyes their characteristic sparkle. The most common highlight is a large, rounded shape, often an oval or a circle, placed in the upper part of the iris and pupil. This represents the main light source hitting the eye.
You can also add a smaller, secondary highlight, perhaps a tiny circle or a thin rectangle, in a different part of the iris, usually opposite the main highlight. These highlights should be left completely white, or the lightest color if you're coloring digitally. They really make the eye pop out, don't they?
The placement of these highlights matters, too. They should look consistent if you're drawing two eyes, as if the light source is coming from the same direction for both. This step is pretty much what gives the eye its life, arguably.
Step 5: Defining the Brows
While not technically part of the eye itself, eyebrows play a huge role in expressing emotion and framing the eye. They usually sit just above the upper eyelid, following its general curve. Anime eyebrows can range from thin, delicate lines to thick, expressive shapes.
For a standard, neutral expression, draw a gentle arch above the eye. The thickness and length can vary depending on the character's personality. A character with strong, bushy brows might seem more serious or intense, while thin, neat brows can suggest a more refined or gentle personality. They really add a lot to the face, in a way.
Remember that the position and angle of the eyebrows can drastically change the eye's expression, so pay close attention to them. Slightly raised brows can show surprise, while lowered brows might suggest anger or worry, for example.
Step 6: Shading and Depth
Now, let's add some shading to give the eye a sense of depth and make it less flat. The iris is usually shaded with a gradient, meaning it gets darker towards the top, just under the upper eyelid, and gradually lightens towards the bottom. This is because the upper eyelid casts a slight shadow over the iris.
You can use your pencil to gently fill in the iris, making the top part darker and fading it out. The pupil should be the darkest part of the eye, a solid black circle. You might also add a very subtle shadow just under the upper eyelid, on the white part of the eye (the sclera), and perhaps a tiny bit under the lower eyelid to suggest volume. It's just a little bit of shadow, but it makes a big difference.
Don't forget to leave your highlights completely untouched by shading; they need to stay bright to create that sparkle. This shading really helps the eye look three-dimensional, which is rather cool.
Step 7: Refining Your Lines
At this point, you've got the basic structure and shading down. Now it's time to go over your lines and make them crisp and clean. Use a darker pencil or an inking pen to trace over your final lines for the eyelids, lashes, and the outer edge of the iris and pupil. This step really makes your drawing look finished and polished.
You can erase any stray pencil marks or guide lines that you no longer need. Pay attention to the varying thickness of lines; the upper eyelid line is often thicker than the lower one, for instance. This helps create a sense of weight and realism, even in an exaggerated style like anime. It's almost like giving your drawing a final polish, you know.
Take your time with this part; clean lines make a huge difference in the overall appearance of your anime eye. A steady hand is pretty helpful here, too.
Step 8: Adding Color (Optional, but Impactful)
If you're planning to color your drawing, this is the stage to do it. Choose your desired eye color for the iris. Remember that gradient shading we did? When coloring, you'll want to apply your chosen color, keeping that darker-to-lighter fade in mind. You can use different shades of the same color to enhance this effect.
For example, if the eyes are blue, use a darker blue at the top of the iris and a lighter blue or even a hint of light green at the bottom. The highlights, as mentioned before, should remain white or the lightest possible color. Adding color really brings the eye to life and can convey even more personality, which is pretty neat.
Don't forget to add a touch of color to the skin around the eye, and perhaps a subtle blush if your character is feeling shy or excited. These little touches can really make your drawing pop, you know, and give it that finished look.
Exploring Different Styles: Male vs. Female and More
One of the cool things about learning how to draw anime eyes is that the basic steps can be adapted to create a huge variety of looks. The "My text" source mentions learning to draw eight different styles, and that's really the beauty of it. Once you have the foundation, you can tweak things to fit any character, which is rather useful.
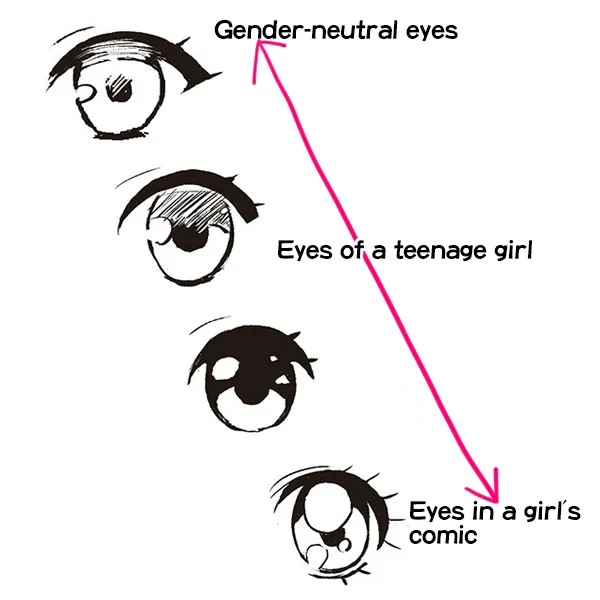
Drawing Female Anime Eyes
Female anime eyes tend to be larger and rounder than male eyes, often with more prominent lashes. The upper eyelid line is usually thicker, and there's often a noticeable crease line above it. The highlights are also typically bigger and more numerous, giving a very sparkly or dreamy appearance.
The iris might be very large, taking up a good portion of the eye's visible area, and the pupils can sometimes be larger too. Lashes are often drawn in distinct, thick clumps that fan out beautifully. Eyebrows for female characters are usually thinner and more arched, conveying a softer or more graceful feel. It's almost like they have a little more room to express themselves, you know.
Think about how you can use these elements to show different female personalities. A shy character might have very large, wide eyes, while a more serious one might have slightly narrower, more intense eyes. There's a lot of room for personal touch, really.
Drawing Male Anime Eyes
Male anime eyes are generally narrower and more angular than female eyes. The upper eyelid line might be less curved and sometimes almost straight. Lashes are typically much less pronounced, often just a few subtle lines or none at all, particularly on the lower lid.
The iris and pupil might be smaller in proportion to the overall eye shape, and highlights tend to be fewer and smaller, giving a less "sparkly" but still expressive look. Eyebrows for male characters are often thicker and straighter, conveying strength, seriousness, or even a bit of ruggedness. They tend to be a bit more understated, you see.
Consider how these differences can show a character's role or personality. A heroic character might have very sharp, determined eyes, while a more laid-back character could have slightly hooded or relaxed eyes. It's about subtle changes that make a big impact, honestly.
Other Expressions and Eye Shapes
Beyond gender, anime eyes can show a huge range of emotions. For surprise, you might draw the eye very wide open, with the iris and pupil appearing smaller. For anger, the upper eyelid might be lowered, and the eyebrows furrowed downwards. Sadness can be shown with slightly drooped eyelids and perhaps a tear or two.
Some styles feature very thin, slit-like eyes for cunning or sleepy characters. Others have very round, innocent eyes. The key is to play with the basic shapes you learned. Changing the curve of the eyelids, the size of the iris, or the angle of the eyebrows can completely transform the expression. It's like a whole language of its own, in some respects.
Remember, the steps you've learned here are a foundation. You'll be able to use them to draw any shape and style of eyes in the future, which is pretty exciting. Practice different expressions, and see how much life you can breathe into your characters just by changing their gaze.
Tips for Bringing Your Anime Eyes to Life
Drawing the basic shapes is one thing, but making those eyes truly expressive and full of life is another. Here are some extra tips to really make your anime eyes shine, you know.
Think About the Character: Before you even put pencil to paper, consider who your character is. Are they cheerful, serious, mischievous, or sad? The eyes should reflect their personality. A bubbly character might have very round, bright eyes, while a mysterious one could have narrower, more intense eyes. It really helps to have that idea in your head, typically.
Vary Your Line Weight: Don't draw all your lines with the same pressure. Make the lines that are closer to the viewer or that define important features (like the upper eyelid) a bit thicker and darker. This adds depth and makes your drawing more dynamic. It's a subtle trick, but it makes a big difference, honestly.
Master the Highlights: Those bright white spots are crucial. Experiment with their size, shape, and placement. A large, circular highlight can make an eye look innocent, while a smaller, more angular one might suggest determination. Sometimes, adding a tiny starburst highlight can give an extra sparkle, too.
Practice Expressions: Don't just draw neutral eyes. Try drawing happy eyes, angry eyes, surprised eyes, or sleepy eyes. Pay attention to how the eyelids and eyebrows change with each emotion. This is where the real fun of how to draw anime eyes comes in, arguably.
Reference, Reference, Reference: Look at your favorite anime characters! Study how their eyes are drawn in different situations and expressions. Don't copy directly, but use them as inspiration to understand various styles and techniques. This is a great way to learn, you know.
Don't Forget the Eyebrows: As mentioned, eyebrows are super important for conveying emotion. A slight tilt or curve can change everything. Practice drawing different eyebrow shapes and positions to see how they impact the eye's overall feeling. They're almost like the secret weapon for expression, you see.
Add Subtle Details: Sometimes, a tiny detail like a faint vein in the white of the eye or a very subtle gradient in the iris can add a lot of realism and depth. These are little touches that make your art stand out, truly.
Experiment with Color: If you're coloring, try using more than one shade in the iris to create a richer, more vibrant look. You can also add a subtle blush around the eyes or a hint of shadow to make them feel more integrated into the face. It's pretty much about layering colors, you know.
Keep it Consistent: If you're drawing a character, try to keep their eye style consistent throughout your drawings. While expressions change, the fundamental shape and characteristics of their eyes should remain recognizable. This helps your character feel more real, basically.
Have Fun with It: The most important tip
- Jason Weaver Wife
- Jack Schlossberg Gay
- Is Victoria Caputo Still Married
- Erika Buenfil Net Worth
- 1911 Forum
How to Draw Anime Eyes and Eye Expressions Tutorial - AnimeOutline
Tips for Drawing Male and Female Eyes – Part 1 - Anime Art Magazine
How to Draw Anime Eyes – Master 3 Eye Expressions

